Thank you for joining and getting started with the article. By default notim.app (formerly Notify Me app) will automatically be set up with all basic settings. Let’s discuss one by one all options available in Settings.
1. Status:

Make sure the status must be enabled in order to use the Back In Stock Reminders. If you want to use the Back In Stock button on either the Desktop device and/or the Mobile device then just tick/check Desktop Enabled and/or Mobile Enabled checkboxes and press the Save button.
2. Product Page Button:
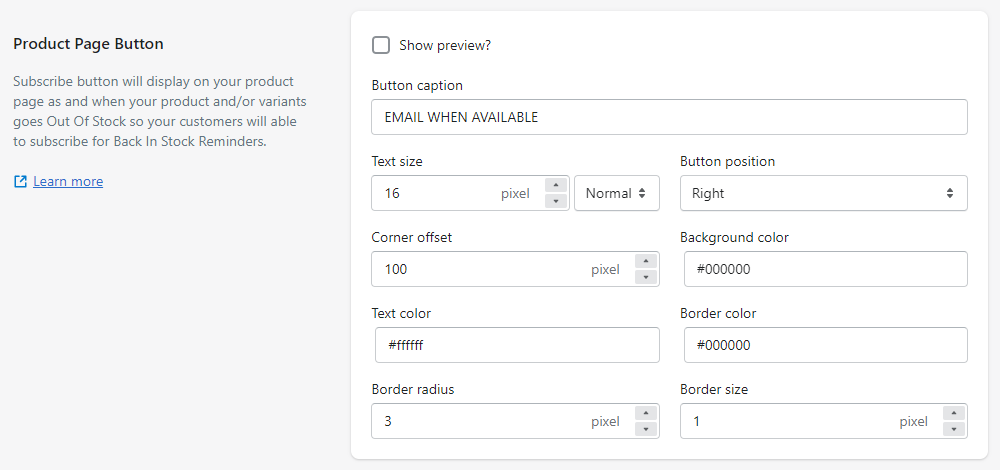
Show preview: By checking/ticking the option, you can see the preview of the Back In Stock button on the configuration page. It will help you while configuring the button.
Button caption: By using this option, you can set (specify) the text which you want to display on the Back In Stock button.
Text size: Here, you can set (specify) the text font size (in pixels) of the Back In Stock button. Also, you can apply either the “Normal” or “Bold” effect to the text.
Button position: By using this option, you can choose the position of the Back In Stock button on the screen. Here, the app offers 4 options that are Left, Right, Bottom-Left, and Bottom-Right.
Corner offset: Here, you can set (specify) the offset value (in pixels) to display the Back In Stock button on the screen. Here, the app will put the blank spaces of specified pixels from the edge of the screen.
NOTE: The app will put the blank space from the edge selected in “Button Position”. For example, Button Position = Top, then the app will put the blank space of the specified pixel from the Top edge of the screen.
Background color: By using this option, you can choose (set) the background color for the Back In Stock button. You can use the available color picker to choose the color.
Text color: Here, you can choose (set) the color for the Back In Stock button text. You can use the available color picker to choose the color.
Border color: By using this option, you can choose (set) the border color for the Back In Stock button. You can use the available color picker to choose the color.
Border radius: Here, you can set (specify) the value (in pixels) to display the Back In Stock button with a curved border.
Border size: By using this option, you can set (specify) the value (in pixels) for the size/width of the border of the Back In Stock button.
3. Signup Form Customization:
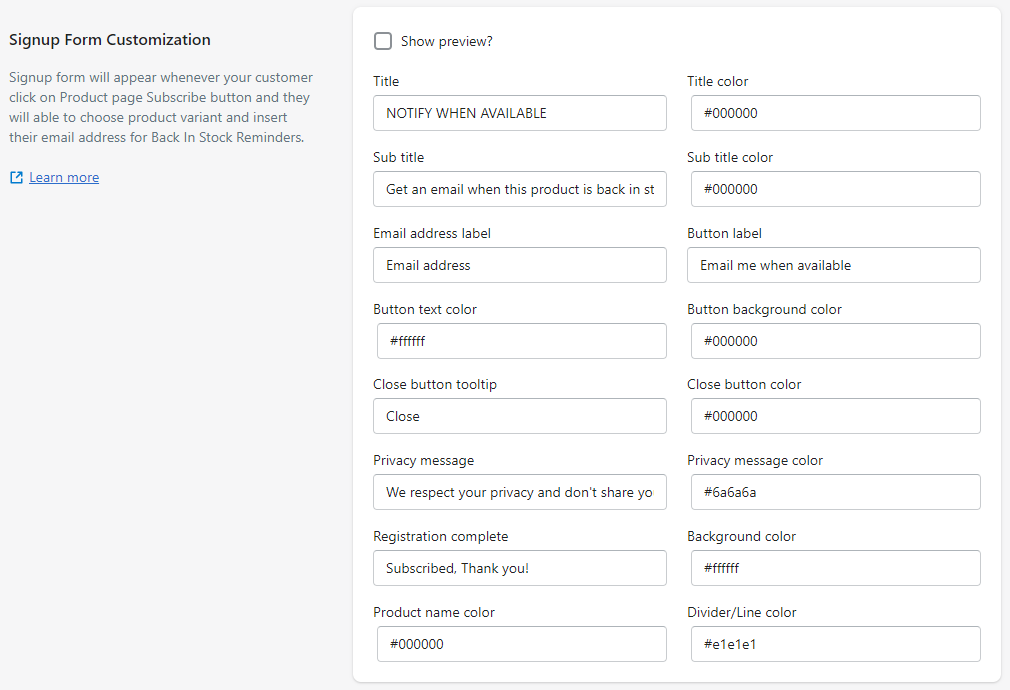
Show preview: By checking/ticking the option, you can see the preview of the Signup Form on the configuration page. It will help you while configuring the Signup Form.
Title: By using this option, you can set (specify) the text for the Title which you want to display in the Email collector box.
Title color: Here, you can choose (set) the color for the Title. You can use the available color picker to choose the color.
Sub title: By using this option, you can set (specify) the text for the Sub title which you want to display in the Email collector box.
Sub title color: Here, you can choose (set) the color for the Sub title. You can use the available color picker to choose the color.
Email address label: By using this option, you can set (specify) the label text which you want to display in the Email collector text area.
Button label: Here, you can set (specify) the text that you want to display on the Submit button.
Button text color: By using this option, you can choose (set) the color for the Submit button text. You can use the available color picker to choose the color.
Button background color: Here, you can choose (set) the background color for the Submit button. You can use the available color picker to choose the color.
Close button tooltip: By using this option, you can set (specify) the tooltip text that you want to display when a customer will hover over the close button.
Close button color: Here, you can choose (set) the color for the close button. You can use the available color picker to choose the color.
Privacy message: By using this option, you can set (specify) the text for the Privacy message which you want to display in the Email collector box.
Privacy message color: Here, you can choose (set) the color for the Privacy message. You can use the available color picker to choose the color.
Registration complete: By using this option, you can set (specify) the text that you want to display when the Email is successfully submitted.
Background color: Here, you can choose (set) the background color for the Signup form. You can use the available color picker to choose the color.
Product name color: By using this option, you can choose (set) the color for the Product name. You can use the available color picker to choose the color.
Divider/Line color: Here, you can choose (set) the color for the Divider/Line. You can use the available color picker to choose the color.
4. Custom Styles:

This is a completely optional and advanced part for the merchants who have developers/designers with them or who know the CSS design language. In a normal scenario, you never need to do anything in the Custom Styles part. But if you need advanced modifications on the design for Back In Stock and/or for Signup Form, in this case, you have to include CSS Classes here.